Your fibercrafted items, whether it be handspun yarns or items that have been knitted, crocheted, or woven, have texture and details. When taking photos of your product, you want to show off these textures and details to your audience.
In a previous post, I wrote about the qualities of different types of light. However, in addition to light, shadows (and the subsequent highlights) are also an important element of defining texture in photography. Without shadows & highlights to act as a contrast, you cannot see detail and texture. Shadows are just as important to photography as light.
By angling your light in different directions, you can produce the necessary shadows to show off texture and detail. The direction of your light determines where the shadows fall, and how much of appears in the final photograph. (The same principles also apply to portrait photography.)
If you remember from your high school physics class, light bounces. Light bounces at the same angle it strikes the surface(1). Remember this fact, as I discuss lighting from different directions and angles to help show off your work.

Front Lighting
I'm sure many of you have taken a photo with your on-camera flash and the photos have a flat and washed-out look, or where your subjects have that deer-in-the-headlights look.Most on-camera flashes provide straight-on, front lighting to a given subject. This type of direct light literally washes away any shadow that might provide any texture or detail, which results in that flat and washed out look characteristic of photos using a direct front flash.


Side Lighting
In contrast, when you take photos with the light at one side or another, this is known as side lighting. It emphasizes texture and shape, which is important when you want to show off your handmade goods, like yarn, knitted/crocheted garments, etc.
The camera is able to pick up on the shadows and highlights produced by the angle-to-subject ratio.

I often use a lot of side lighting at home, where the light is coming off to one side (via a sliding glass door or other light source). You can do this at home as well, if you find a large window where light is streaming through it. Position your subject (and yourself) with the light coming from the side.
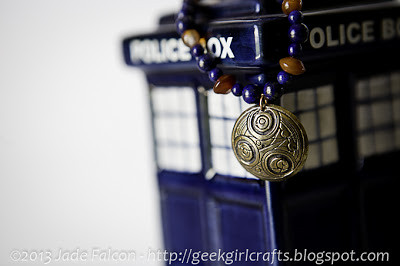
In both of these photos, the shadows provide enough depth and detail that you can see the texture of both the pendant and the linen stitch.

Back Lighting
In addition to side lighting, there is back lighting where the light is behind the subject, shining at the camera.

The advantages of backlighting is that it helps highlight fuzzy projects that have a halo (such as mohair or angora). It can really convey the softness of a particular knitted object. However, backlighting should not be your only source of light for your photograph of your handmade items. If it were, you'll only get dark shadows, like this photo below. (2)


You can also backlight a subject by either placing the light source to the back and side. A large window with a lot of sun streaming through it can act as both a side and back light. You can also go outside in the sunlight and position your subject accordingly.

As a note of caution, backlighting can cause some problems with getting the correct exposure. You need to ensure that your exposure is set on the subject and not the backlight. For instance, in this photograph, I'm using the window light as a side and backlight. The rightmost part of the image is overexposed but you can see some of the fuzziness of the yarn being photographed.

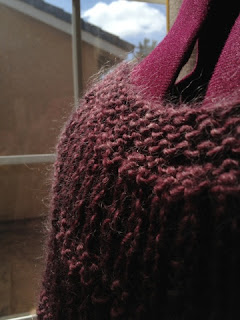
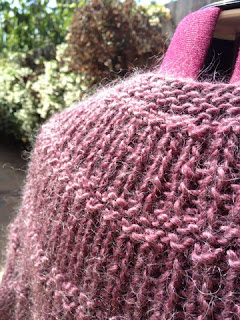
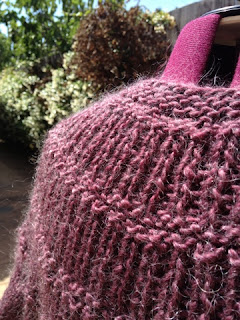
You'll have to play with the exposure with backlit objects in order to get it correct. In the following three (straight-from-the-camera) photos, I have the light coming from the side from a glass window, which provides backlighting and some sidelighting. You'll notice that I've played with the exposure settings to try to get a balance of the fuzziness with good side lighting, but each one of these have their own set of problems.
- The exposure works for the sky and clouds in the background, but might be slightly too dark to show off the sweater very well, although you do get to see some of mohair halo.
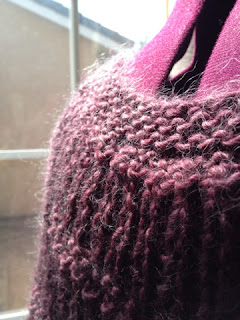
- The sky & clouds are over exposed, but I get more of the halo of the sweater and bit more light
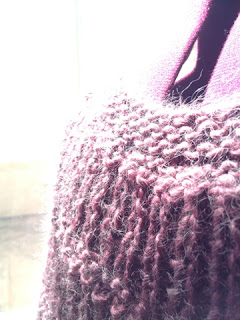
- Everything in this photo is overexposed. You definitely see all of the halo of the mohair, but there's no detail in the background anymore.
1)  2)
2)  3)
3) 
2) 3) So, how do you fix the exposure? In the case above, I simply did not have enough light in the front area to take a properly exposed photo. Moving the sweater outside solved THAT problem, because I am able to get more light in general. (But, I still needed to play with the exposure settings even outside.)
Another solution is to use two separate light sources -- your main light source off to the side and a secondary (and weaker) light source behind the subject. (This is an example of cross lighting). In the above outside photo, the sun was acting as my backlight and sidelight because light is bouncing off everything,

If you really want to get more lesson about light & photography, I HIGHLY suggest this book, Light: Science and Magic: An Introduction to Photographic Lighting
If you would like to see some of my photography work, please take a look at my Photography website - WyldFire Studios.
Questions?
Let me know. I'd be happy to help you answer any you might have.
Footnotes:
(1) Different surfaces, such as reflective or translucent surfaces (glass/water), will cause light to bounce differently. So, the angle of reflection is relative to the surface from which it bounces. But, for the purposes of this post, we're dealing with matte surfaces.
(2) There are reasons to do backlit only photos, but product photos are not necessarily a good candidates for it!
No comments:
Post a Comment