Thursday, December 31, 2015

Last Finished Object of the Year: Red Iced Cardigan

Well, the sweater that I was trying to get finished in two weeks...didn't. However, it did get finished on Christmas day; a small present to myself. It took a total of 21 days to finish this sweater, which all things considering, isn't too shabby.

I really did try to get it finished in 14 days. At day 15 (December 16th), it looked like this:


It wasn't quite done, but it definitely looked like a sweater. I had finished the whole body including the sleeves. But the shawl collar wasn't anywhere near started. 

However, I had to put it aside because we were going to be hosting a Christmas Eve dinner at our house. There was a LOT to get done, which wasn't going to happen if I knitted on the sweater.

Part of the house cleaning involved completing the organization of the craft room, which meant that a lot of stuff would get taken out of the dining room (i.e. off the dining room table), which meant that we could actually using the dining table AS a table. (I'll post about THAT later...)

Insofar as this sweater, I really loved this pattern. It was extremely simple, yet elegant and functional. The seed stitch looks awesome on the shawl. There's a bit of waist shaping so that, despite it being a chunky yarn, it is slightly fitted. 


I LOVE the yarn too -- Queensland Chunky Kathmandu -- is a Merino, Cashmere, Silk blend. It's warm AND soft. Heck, I wore it a few times before I got around to putting buttons on it.

Finding the right buttons was a bit of a challenge. I went through my button box and tried a few that I had. I picked these out as they seemed to work, but I'm not even sure that I like the buttons. The jacket was perfectly serviceable without them.


I might replace the buttons at a later date, when and if I can find something more appropriate. But for now, these will do.

Have I mentioned that I LOVE this sweater?

Tuesday, December 15, 2015

Creating and Organizing Crafting Supplies

As most of my friends know, my entire house pretty much serves as one big huge crafting room. The dining room table has been our main workstation for quite some time, which leads to project sprawl....

(Not my house, but close enough....)

 Also, our storage situation has been hit or miss for quite some time. We primarily use a lot of plastic storage bins that stack, but this solution has proven inefficient.

We decided to finally tackle the problem head-on. I've been looking at various craft room ideas on Pinterest and such. Many use the Ikea Kallax / Expedit cases for storage. So, first, I decided to tackle my fiber & yarn stash first.

We picked up a 4x2 and 4x5 Kallax bookcase, stacked them onto each other, then bolted them to the wall in case of earthquakes.


Then using the storage bins (also from Ikea), I started organizing my stash by fiber and yarn weight; commercial vs. handspun. (It turns out that I didn't buy as many as I needed, so I need another trip to Ikea.)
  •  Top row - All fiber, which includes top, roving, braids, silk hankies, etc.
  • Second row (white) - Sweater amounts of yarn to individual aran/bulky weight
  • Third row (yellow) - Worsted weight yarn to sport weight
  • Fourth row (needs more bins) - Handspun yarn
  • Fifth row - Fingering/Sock weight + UFOs + Weaving supplies
  • Sixth row - Patterns, notion, and still unsorted yarns.

(Fleece amounts of roving are in another location.)

This sorting actually freed up quite a bit of space and confined it to a specific area (instead of having it all over the room).  Seeing it one location made me realize that I actually don't have as much fiber and yarn that I thought I did. Of course, this doesn't mean that I'm going to run out and buy more fiber and yarn, but it's nice to take stock!

Consolidating the Stash made it easier to put the industrial sewing machine into a closed room, whereas it was in our living room previously. Having it in the room means that we can close the door and not scare the cats with the very loud industrial motor.


As you can see by the photo, we're still not quite finished. We need to pick up more Kallax bookcases so that we can start organizing the sewing supplies too!

This process is going to be take a little bit of time to finish the whole room, but it's freeing up a lot of space in the rest of the house.

Friday, December 11, 2015

Quick Knit Sweater

After the disaster with my sock that I put into time-out, I wanted to start a quick knit project, preferably another sweater that just involved stockinette. (It's been COLD lately.) So, I went to my Ravelry queue and looked at projects for which I had yarn.

I came across, ICED, on Knitty. It pretty much met my requirements.
  • I had the yarn, which was Queensland Kathmandu Chunky (merino, cashmere, and silk). 
  • It was a sweater.
  • It was primarily stockinette.
  • Many Ravelers said that it was a really quick knit.
So, on a Friday evening, I swatched and got gauge at a US 10.5 (after steam blocking).


I pretty much knit on it non-stop over the entire weekend, which gave me half a sweater. I knitted at work during meetings, and even at the Mythbusters tour.


By Wednesday, I had the full body of the sweater completed, including adding pockets!


I still need to add the sleeves and collar, but if this continues at this pace, I'll have finished a sweater in two weeks! Woohoo

Thursday, December 10, 2015

Project Time Out

I've been on a sock knitting kick as of late. I had just finished my Hulky Invader (Zim) socks.


And I wanted to knit more self-striping yarn. I went through my Stash and found Electric Avenue by Stray Cat yarns. I previously had made  fingerless mits with it, but had plenty left over for socks.


I managed to finish the first of the pair but broke a set of knitting needles (US 0).  However, on the second set, I broke 3 sets of needles before I even got to the heel!


And to make matters worse, I misplaced the first of the pair! Needless to say, I was extremely frustrated, so I've decided to put this project on "time out" until I am ready to tackle it again.

And not to mention that I need to buy more US 0 needles before I finish it.


Tuesday, November 24, 2015

T-Shirt Surgery

Two weeks ago, a friend invited us over to make custom t-shirts. I went to Joann's Fabrics and bought a slightly oversized shirt to make a specific Geek Girl Crafts log shirt. The shirt I chose was oversized shirt because they didn't have any in my size in grey; a color I thought would look good with our logo.

The shirt is too wide & long for me. I wanted my t-shirt to be a bit more fitted, shorter, and have a V-neck instead of the high crew neck.  A little bit of t-shirt surgery would make it fit.


First, I grabbed one of my existing t-shirts that I knew fit me fairly well. (I got that one from Tee Fury several months ago.) I turned the grey t-shirt inside out, and lined up the shoulders and general neckline.


I traced around my fitted shirt and pinned accordingly. I added an extra 1/2" seam allowance to the initial line that I drew, and basted along that new line.


NOTE!! Make sure to add that seam allowance BEFORE you sew, otherwise it'll be too tight!

I tried on my t-shirt to make sure that it fit first, before I did anything permanent (like cutting the fabric). For myself, I actually added a tiny bit extra seam allowance for a total of 5/8ths seam allowance for this t-shirt.

Once I liked how the t-shirt fit, I used my serger to sew an overlock stitch along my baste stitches. If you don't have a serger, your sewing machine should have a zig-zag stitch.  (Make sure that your sewing machine is set to the correct type of fabric -- in my case, knit jersey.)

Once you have sewn your new seam, cut off any excess fabric.


My trace line actually was shorter than my fitted shirt. I simply cut off the bottom of the shirt, used my serger for an overlock stitch (or you can use a zig-zag stitch) all around the bottom of the t-shirt and hem it.  I ended up cutting two inches of extra fabric from the bottom before hemming it with a straight stitch.


Here's the newly modded t-shirt next to my fitted shirt. It's a little bit bigger, but I'm okay with that.


The next thing I wanted to tackle was the neck. I found a good tutorial that walks you through creating a V-neck from a crew neck and re-using the ribbing band.

As a warning, Steps  8-10 are a bit fiddly. I suggest stopping at Step 8 from the edge and sew the band down by hand first.

But I really like the results!!

Tuesday, November 17, 2015

Making Your Own T-Shirts

A friend of mine recently got back into t-shirt making. She invested in getting a t-shirt press.


She also got a cricut machine and printer that allows for printing out t-shirt transfers.

Then, she invited us to come over to come make t-shirts. We bought some 100% cotton t-shirts from Joanns and I dug around for some of the graphic images I've made.  My friend JP had his club logo, while I used an archery image I created for my archery club and the Geek Girl Crafts logo.

We made t-shirts, watched a really good movie (Kingsman), and ate. It was a really good evening.
The t-shirts came out really well. Her set-up specializes in darker t-shirts. It took a bit of work as it does require some prep-time with the images, but it was totally worth it.


Here's the final t-shirt that I wore at my archery practice. The other archers loved it.


And the Geek Girl Crafts logo? This is the logo after coming out of the cricut machine. I'm in the process of removing the excess bits before I put it onto a t-shirt -- it prints out a bleed for the images. (With her process, you don't need to make the image backwards.)


Then I transferred it to grey t-shirt.Unfortunately, I was unable to find a grey t-shirt that fit me, so I picked up an oversized t-shirt that I am going to cut down to fit me.

But, I think it came out really well. :-)

I can't wait to wear it at the next con!

Tuesday, November 3, 2015

Cosplaying Missy: Persistance Pays Off

As many cosplayers are aware, there are many things that can make or break a costume. One of those things are the accessories for the outfit, especially if you're trying to go for screen accurate. (Although, often times, being "close" is good enough.)

For many of the cosplays that I've planned, I've started looking at a lot of the accessories. Luckily, some of them can be bought. Some can be easily found, but some can be hard to find. Because cosplay can get expensive, I try to keep the price of my purchased props as low as possible.

I managed to find two of my needed props with a bit of luck. First, I found the exact cameo on Etsy after much searching. I think I looked at a few hundred different cameos on both Etsy & ebay, and even went to a well-known vendor who has an assorted set of cameos. The price for cameos ranged from $40-$100 depending on the quality of the piece as most of them were considered "vintage".

Modern resin cameos were much less, but there were very few left facing or of this particular "look".

A photo of the actual cameo from the Doctor Who Experience.
(Courtesy of a Friend's Pinterest page)

Without much success, I began looking at cameos that were "good" enough that would pass the 10-foot rule -- a left-facing cameo of a similar silhouette, size, and potentially color (although I could paint the color in myself if needed). I found a few that were good potential candidates. A friend pointed me to another cosplayer who had molded her cameo and selling painted resin copies (which were just "okay"). If I didn't find what I was looking for, this was my backup plan

Then finally, buried on the 30th page of Etsy looking for "cameo brooch", I finally found the same exact cameo. The price I paid for it was on par with an "okay" replica version, so I am happy with the purchase.

The cameo I found on Etsy.


The black hat she wore proved to be a bit annoying to find...at least online. A few of my local stores, including the Halloween stores didn't have anything in stock. I searched under "tilt hat", "boater", "Mary Poppins". Vintage hats of the right look were expensive ($50.00+) and I was unwilling to pay such prices.


Luckily, I had walked into a Japanese five-and-dime store in the Bay Area, called Daiso, and found a black boater hat. It's not quite right, but the basic shape is correct, which I can modify. Plus at $1.99 USD, it is cheap, so I bought two hats just in case I mess up one.


I'm still hunting around for other props that can be purchased. I'll be making the others as I can.

Thursday, October 29, 2015

Cosplaying Missy: Planning Stages

One of my upcoming projects is Missy from the Doctor Who series. Luckily for me, there's been a lot of research done on this costume by many costumers, including a friend, BritGeekGirl, who has been a Doctor Who fan all of her life. She created two specific Pinterest boards for the Season 9 and Season 8 version of the costumes:


Because there's been so much research into the costume --- the lines of the outift, the trim, buttons, etc., --- I can just concentrate on making the outfit without worrying too much that I'm missing "something". However, I still have to do my own legwork in finding the appropriate color wool for her outfit, a suitable left-facing cameo, and other accessories.

But, first, I have to figure out what pattern I can modify to be close to the Missy costume, which is an interpretation of a late Victorian/early Edwardian clothing. Luckily for me, I have fair number of historical patterns.

So, I went to my historical pattern bin and looked through many of them to see what would work for Missy. I came up with three possible candidates for her jacket.


All three would require modifications, but they are a good basis to start and do the modifications as needed. For now, I might start with the Truly Victorian pattern and make alterations. Why? Because the Truly Victorian patterns are really good patterns, whereas Rocking Horse & Reconstructing History patterns are often quite difficult to decipher their instructions.

For the skirt, I have a Victorian gore skirt from Laughing Moon that should work well enough with modifications for Missy's outfit.

Now, it's just a matter of creating the mockups and getting it to fit correctly and look close enough to the screen version. I still have to look for the appropriate wool for the jacket and skirt, but the mockup should fit well first. I have several months for Gallifrey to finish the outfit. It shouldn't be THAT hard? :-)

Monday, October 19, 2015

Cosplay Planning Stages

I'm starting to plan out my next set of cosplay outfits for the upcoming year. There are a number of conventions and events that I'll be attending next year, so I have an extensive list of costumes that I need to be created with specific time frames -- about 8 full costumes and several smaller costume pieces (not including props). What costumes do I have in mind, you ask? Well, you'll find out soon enough as I post my cosplay diaries. :-)

As part of my preparatory work, I started going through my fairly large collection of patterns -- both commercial patterns (such as McCalls, Simplicity, etc)...


...and speciality patterns (such as Truly Victorian, Reconstructing History, Folkwear, etc.)


I usually buy my commercial patterns from big box stores when they have their sales where patterns are anywhere from $0.99  - $2.00 per pattern.

While I'm fully capable of drafting out my own patterns, I don't like having to do it. Although I have drafted my own patterns since there was nothing even close commercially. I try to use pre-made pattern whenever possible. 


Eventually, after some consideration, I found the patterns that should work the costumes that I need to make, with some modifications.


I also dug through our extensive Fabric Stash (TM) and found appropriate fabric for use for a December event.


Now, it's time to wash and iron muslin to create some cosplay outfits!

Thursday, October 15, 2015

FO: Lava Socks!

I realized that I had been so busy posting about my cosplays that I have completely neglected posting anything about fiber arts as of late. Although, admittedly, I haven't had much in terms of a lot of finished objects. Plus, as I am knitting a lot of solid color projects, it almost seems like there's no progress on some of them.

However, for now, I shall give you this one! I finished this last month (yes, I know, I'm super late in even posting about it). I bought some self-striping yarn at my LYS. They had this colorway specifically made for them -- they wanted something with fire. The dyer came back with this beautiful colorway called "Pele" -- after the Hawaiian goddess of the volcano.

It's a lovely dark grey (for the rocks) and a variegated striped section of yellows, oranges, and reds. I love the combination of self-striping and variegated colors. Plus, the yarn is really a delight to knit.

As a precaution, I took a page out of the Knitmore's playbook, and performed a citric acid soak on the socks, as a precautionary measure. It was well worth the 5 minutes of extra time to perform this little task to ensure that the colors don't bleed, run, or fade.

Then, of course, I realized that these are also the colors of the Gryffindor House from the Harry Potter Universe.


I'm okay with that.

Yarn: Berry Colorful Yarnings - Saturated Sport, Self-Striping
Colorway: Pele -- special custom dye from Purlescence Yarns.

Tuesday, October 6, 2015

Cosplaying Hawkingbird: Best in Show

ConVolution 2015 has come and gon, and we had an awesome time. There were a few people who recognized the cosplay, but many actually confused it with the Huntress (which is another cosplay that I want to do.) It was okay, and I didn't mind the confusion. There weren't a lot of comic book fans at ConVolution. I do hope to wear it again for Fanime, where there are a lot of Marvel geeks who attend or maybe even SDCC.

Overall, the costume was pretty comfortable to wear. I wore it for the Masquerade, out to the Dance, and for some of the parties afterwards. However, I did ditch the bow for the dance and parties, just because I didn't want to have to carry a cumbersome prop around with me in close quarters....or where I could potentially lose it by setting it down and either forgetting or someone taking it. After all, I did use my real bow for the Masquerade. I'm also really glad that I opted to not carry the sword with me as well. It would have been really too much to haul ALL that stuff around.


The Making of....

The Masquerade - Best in Show

It wasn't our initial intention to enter the masquerade with our costumes, but we decided a few weeks before the Con that we would.  It was a scramble to figure out an appropriate skit -- ideas were bantered about for a while we figured out what skit we wanted to do, determine what music would be best, then record voice-overs and intros appropriately. Even then, I had to put together the audio file for the masquerade late Friday evening (as the actual masquerade was on Saturday.) My Viking acted as our physics-defying ninja, but we also had to find a willing vic...errr...volunteer to help us out on stage, merely as an extra.  Things got a bit hectic in trying to organize everything, but it was well worth it.

Our skit went off with minimal issues. First, I totally forgot to wear my gloves on stage. Then there was a few missed cues as we didn't quite do extensive practicing, but the audience laughed at the appropriate times so no one really noticed. Overall, it went about as well as to be expected, so I was happy it it overall.

We won Best in Show for our skit, Too Many Archers, as well as winning a workmanship award for Best Accessories. The presentation judge told us that he nearly fell out of his chair as he was laughing so hard.

(Photo courtesy of Baron Law)

I honestly can't wait to see the skit on video, because I'd like to see it from the audience perspective. I was too busy concerned with not screwing up any more cues so I wasn't paying too much attention.

Here are the characters that were cosplayed by BaronLaw and I.


And final photos just after the masquerade.

It's not too shabby, even if I do say so myself. I will post the videos once they are available online for anyone interested in seeing our skit.

Wednesday, September 30, 2015

Cosplaying Hawkingbird: Making Arrows

It's a couple day before Convolution 2016, and this is probably the 2nd to last project entries for this cosplay. I'll get photos of myself and my partner together.


Bow Props

As Hawkingbird is an archer -- something that I am proud to also call myself -- I figured it was going to be relatively easy to put together her archery weaponry.  I was proved wrong. I should really learn that things that appear easy, tend to not be THAT easy.

I didn't need to make any bow, because I already have a bow -- a simple Samick Sage.


The bow is pretty light, but I wanted to make a bow sling --- in purple -- for me to hold it with little effort, so I learned how to make one from paracord, using various tutorials on the web (like this Indestructible tut and others).

My prototype of the sling was made out of black & red. I made a 4-strand braid first, then added a cobra braid.

4-strand braid & cobra braid

I added some "bling" to my cobra braid by stringing the green cord and adding some large beads I found at the store.


I made a purple & black version, which I forgot to take photos of, but you get the gist. Then, it was a matter of making the leather piece for the braid. I made a quick template, based on some photos I saw online, then cut out the piece from some scrap leather that I had.


It came out a little bigger than I anticipated. However, luckily, I found a seller on ebay that sold them for about $3.00 a piece, which is a lot less than I can make it, so I ordered one.

But I still needed arrows for the costume. The arrows were easier to make than the mask or belt, but some work had to be put into it.  First, I couldn't use my REAL arrows, because they are weapons with sharp point tips and can be potentially dangerous, so I didn't want to use them. Plus, I wanted to be larger than life. (Real arrows are tiny things that you don't realize are arrows because they're small in order for them to fly very far at very fast speeds.)

Building Arrowheads

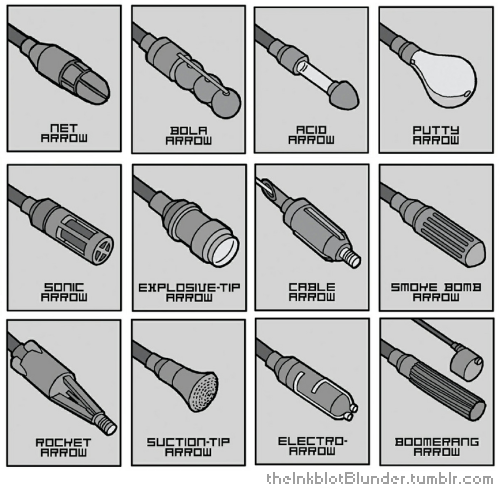
I started making arrow heads using my 3D printer at work. The "real Hawkeye" (aka Clint Barton) had his own set of special arrows.


Luckily, I found a 3D print file that let me print out some of them.


You might recall me discussing printing out cosplay props in a previous post. I printed several different types, which came out looking great.

Building Arrow Shafts

What's an arrow head without shafts?  I know that some cosplayers use wooden dowels to build their arrows. However, I had a easier source of arrows. My archery club has old unused arrows that are discarded by other archers. They told me I could use them for any purpose, as long as it wasn't for shooting.  So, I picked up a few very fat arrow shafts.

I primed and spray painted a deep dark purple, as all of Hawkingbird's outfit is a deep dark purple. Then I finished them off with a gloss coating


Fletching Arrows

All arrows need fletches, which act as stabilizers when they fly through the air. I was going to get some large feather fletchings from the archery store, but then found out that they were super expensive for what is simply a costume prop. (If I was putting them on REAL arrows, sure...but, they were $5.00 a piece and I needed about 9 of them, so no.) 

I thought, "Okay, how hard can it be to actually make my own fletchings?" The answer is....not as easy as I thought. An entire profession was once based on being able to fletch arrows. However, I did manage to make passable fletchings. They aren't suitable for real arrows, but look good enough for cosplay.

I got some turkey feathers from my local craft store for about $3.00.

I split the feather in half, cutting down the spine using an exacto knife. This is harder than it sounds. 
TIP: Start at the top of the feather instead of the bottom quill. Make a very short cut towards the top of the feather, then continue making small cuts until you reach the "quill" part of the feather.

Then I shaved down the uneven bits of the feather so that it would attach easier to the arrows.

Afterwards, I cut them into appropriate sizes for my arrows. In my case, as the arrows are really fat, I made four inch vanes.

Luckily, as an archer myself, I have a fletching jig, which helps me correctly place the feathers into place. If you don't have one, put a very thin line of super glue onto your feather and place the first one onto your arrow. Then equally space 3-4 feathers around the shaft.


I opted for three fletches because it's my preference for my real arrows. And I didn't have that many feather vanes. However, the finished arrow looks pretty darn good! 

Here's an entire quiver of arrows.


And here are my prop arrows versus my real arrows for comparison.
(left-to-right: Fake, Aluminum, Carbon Fiber)

Insofar as props, these were easier than the others, although the battle staves only required minimal effort on my part, but I really liked how they came out.

A little effort went a long way.


For those following at home:

The Making of....